Page 10 of 25
Re: 1994 Model 15/45 By Wayne Schell
Posted: Sun Nov 23, 2014 11:56 pm
by joshua1086
Wayne, I cant wait to see another update!
Is the BOSS's chair going to be foldable? How are you moving it forward without it hanging over the stair case?
Re: 1994 Model 15/45 By Wayne Schell
Posted: Mon Nov 24, 2014 8:10 am
by rusty
Joshua, The bosses chair will be on a swivel. I hope I have enough room to but mine on a swivel so both will turn around. I never did call you back and finish our conversion.
Wayne
Re: 1994 Model 15/45 By Wayne Schell
Posted: Wed Nov 26, 2014 2:01 pm
by rusty
Re: 1994 Model 15/45 By Wayne Schell
Posted: Wed Nov 26, 2014 2:06 pm
by rusty

- I will have to redesign the rear axle

- Front clip
More Pictures. Jim why when I upload a picture does it place it a the start of the post?
Re: 1994 Model 15/45 By Wayne Schell
Posted: Wed Nov 26, 2014 5:10 pm
by beltguy
Hi Wayne.
The software seems to have a mind of its own. That said, you can submit the post and then go back a do an edit. When you open the edit, you will see one or more "attachment" statements. Just move them where you want them. I just moved yours to the end of your post. Pretty simple.
You have been posting some big pictures (over 2 meg). That is great! When the photos are that large, we present them as "thumbnails" and size them to fit the screen (Mary worked that out). Then the reader can hover over your photo and get the full size picture. They can also download the picture if they want - careful what you post


You forgot to tell folks about your milestone last week.
Jim
Re: 1994 Model 15/45 By Wayne Schell
Posted: Wed Nov 26, 2014 6:50 pm
by rusty
OK Jim. Last friday was a big milestone in the life of the Eagle 15. We started the motor for the first time. Jim was kind enough to come up and help me start my motor. It started out with a couple of relays that I over thought. ( dam 87 and 87a ) but we figured that out. Then it became apparent that a 30 amp fuse is not big enough to pull in the starter. Also a 16 gauge wire hot wiring the fuse is not big enough but it is an easy way to remove the insulation. We turned it over without firing it to get the oil pressure up as the motor has been setting for about 7 years. We then hooked up the ECU and turned it over and within 3 turns it was running. We checked all the systems and a couple did not work but that is minor. I shifted it into gear and that worked. We did not drive it as I still have some air control issues on the air bags on the tag axle. ( they are now fixed ). A big Thank you to Ken Arnold and Jim Shepherd for making that engine start so successful.
Wayne
Re: 1994 Model 15/45 By Wayne Schell
Posted: Wed Nov 26, 2014 7:43 pm
by beltguy
Re: 1994 Model 15/45 By Wayne Schell
Posted: Fri Nov 28, 2014 9:57 am
by Eagle Andy
Wow Wayne, The 15 is looking Great, Hope to be able to get together in Jan. We will be in the area the week of the 5th. Hope to see you and Lynn soon.
Re: 1994 Model 15/45 By Wayne Schell
Posted: Thu Dec 04, 2014 8:10 am
by rusty

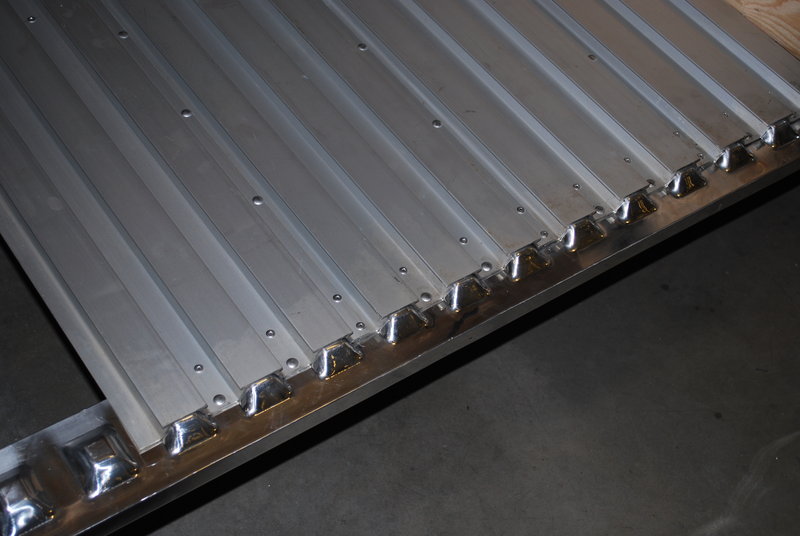
- More flooring

- Bay Flooring and end closures
Post 16 Bay rebuild. Some of the tubing in the bays was showing signs of rust so I cut it all out and replaced it. The tubing did not go back like the stock layout. I made the tunnel a little bigger to make sure all the things that needed to be in it would fit. A lot of the wring and airlines and such are in conduit so it takes a little more room. With all the heater lines, the coolant line, power steering lines, clutch lines, fuel lines, and wires it filled up fast. I rearranged the tubing that runs front to back and added a couple of runs to make it stronger to carry the extra weight. All the tubing was sandblasted and then painted with rust bullet. The flooring did not make through the tear out process so I used new. It was glued and riveted. The end closure pieces were polished and then glued and riveted. After the floor was done we put ½ inch plywood on the other 3 sides. There will be a post about the bay doors.
Re: 1994 Model 15/45 By Wayne Schell
Posted: Thu Dec 04, 2014 8:16 am
by rusty

- Bay complete