Duane & Cheryl's 89 Eagle Model 20
Posted: Mon Oct 13, 2008 8:24 pm
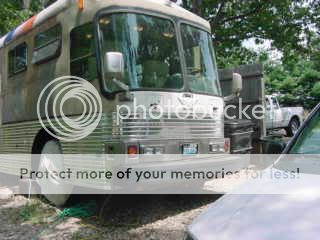
We bought our 1989 Eagle from New Jersey Transit in April just before the attack on the World Trade Center. We did not have the time to drive it home, so we had it shipped to St. Louis, MO. This was the beginning of our conversion, we have only used it one time before we started the 7 year and counting process. This is the Eagle finally at home before we started to convert it .


The first thing we did was to remove the road a/c, this model had the a/c condenser and fan motors above the engine. We also removed the seats and luggage racks. I will never remove seats from another bus, we found some really odd things there as well as in the luggage carrier.

The next task we tackled was raising the roof 6'", Cheryl was very concerned about doing this. When I told her we are going to cut the roof off, she wanted to know where the exit was to escape.


Then came the job of removing the front cap. All the work that you will see done on the Eagle was perfromed by just Cheryl and me.

Finally it was time to install the new cap. This was not as easy as I thought it was going to be with just 2 people doing it. I had Cheryl stand in the drivers area as I lifted it up to her on a scaffold.

I told Cheryl that now it was time to finally have some fun. We began to install the 18 ga steel on the sides, it was July and 100 degree's out. The sheet steel was so hot that we needed gloves to handle it.


Next on this list was to convert the baggage door to cafe doors. I thought I could make a jig to do this, but found out that every door opening was alittle different.

Cheryl then said it was time that we found something really exciting, like a bedroom slide out


Well that little excitiment of the bedroom slide out took 6 months of my time.
In the end it was all well worth it , as you will see in the final pictures.
We decided that since we had a bedroom slide out, why not have a living room slide out as well.


Winter has set in and it gets really cold working outside all the time.


Long time coming, but all the new polished aluminum siding is on the Eagle.


Well it's time to move to the interior since winter has come. All of the interior walls were coated with black undercoat spray

I ran all 110v wiring in blue conduit thru out the bus.

The foaming of the interior walls was not one of our favorite things to do.


Now it was time to put the plywood on the walls.


Instead of using screws to hold the plywood we countersunk each hole and used steel pop rivets.

The 12 volt supplines lines were also run in blue conduit.

The rear veiw camera installed.

The layout of the left side water panel.


The finished left side water service panel.
The right side water control panel


This is the Hurricane hot water heat system. It also heats all of our hot water for dishes and showers. It is diesel fired and also runs on electric as well.

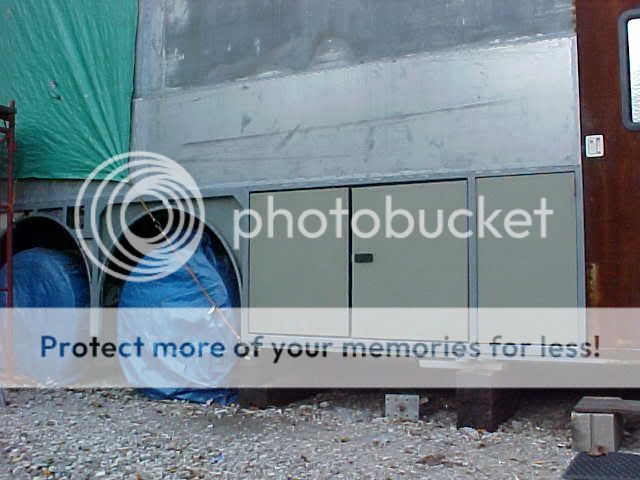
The right cargo area with slide out.

Time to move on to getting the generator in place. It is a 13kw Kubota 4 cyl, all of the parts I got from Dick @ Wrico. This gentleman is one of the best to work with.


I never thought I would make it to working on the interior, but that day finally came.
This is the future cabinet that will have the 37" LCD pop up tv.


Moving onto the front overhead cabinet.


This is the right side of the interior in the living room.

The overhead cabinets above the driver area.


The copilots chair.


The living room slide out on the left front side.

Looking from the front of the bus into the kitchen, this door goes into the bedroom.

This is the kitchen area on the right middle side of the bus.


The control panel area on the left middle of the bus in the kitchen. This area controls the 2 Trace Inverters 2500 mc, the 3 a/c units and the tank monitors.


The full size double door frig.

Looking from the bedroom into the kitchen.

This is the future area for the 110v control system bought from West Marine. The coach is all electric, we did not need 220v so the panels are split into 2 separate 110 v panels. this makes it easier to monitor all the usage.


Pocket door leading to the toilet.

The shower roughed in.


Working on the enclosed toilet area.


Finally finished the toilet area and the pergo floor.


Time to move back into the bedroom and vanity area.


This is the rear of the bus and the bedroom area.


This is the bedroom slide out on the right rear side of the bus.


Wow it's time for me to have some fun with this bus project. This is the rear bedroom 26" LCD tv with a dvd player in the lower part of the cabinet.


The rear bedroom pop up tv done.

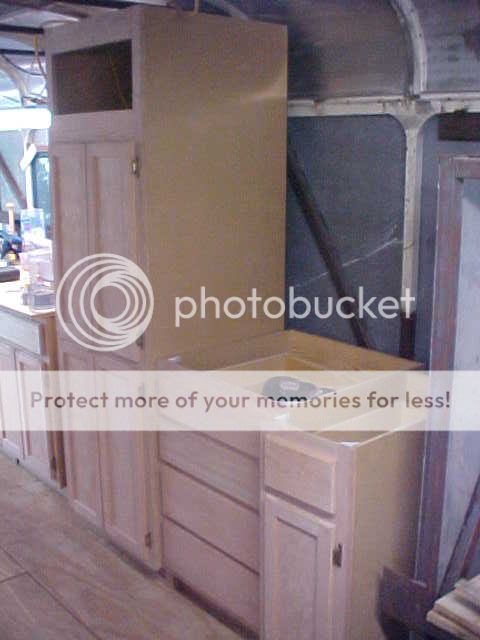
Finally starting to see some progress now. This is the kitchen done except for some trim work and staining on drawers.

This is the living room ceiling finished in an off white headliner, with fabric covered dividers at the joints.

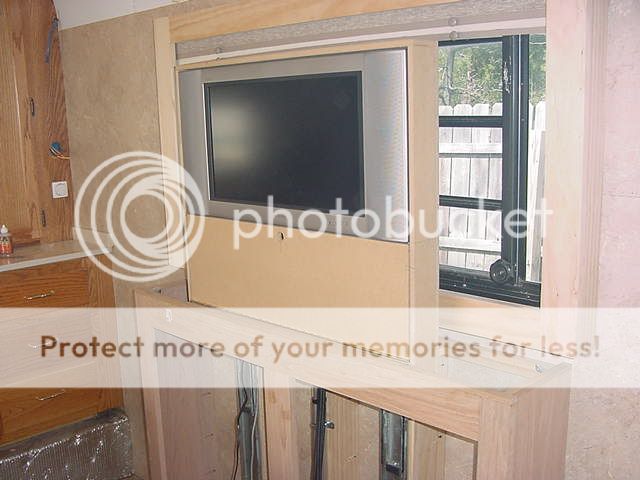
The right side of the bus in the living room, this is the cabinet that has the LCD pop up tv.

The LCD TV raised for viewing. This can be viewed from the living room couch, the dinette, or the front drivers seat when it is turned around.

The left side of the dash finished. The GPS is located on the upper dash above the heater controls.

The right side of the dash.

The laptop is mounted between the captains chair and the copilots chair. It runs the Silverleaf software to monitor all of the engines outputs.

This is the living room slide out finished except for some minor trim.

Looking up in the bedroom is the mahogony tongue and groove ceiling.

The right side of the bedroom finished.

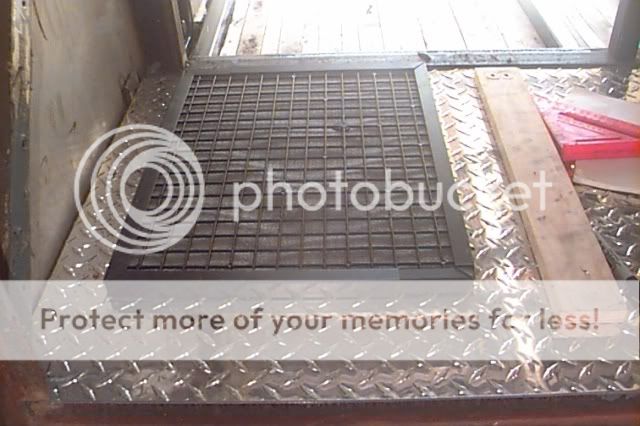
This is the entry steps to the coach.

This is the entry to the Eagle.

The right front bay is for my tool box, aux air compressor and retractable 110v cord. This is all on a slide out tray.

The tool box out for access to the air compressor.

The house batteries are next to the entry door on the right side, it is on a slide out for checking status of the batteries.

The house batteries with the slide out for viewing.

Hoooraaayyyy finally on the road but not painted yet, just in white expoxy primer,, but WE LOVE IT!!!!


If you have viewed these pictures, we want to thank you for your interest and also want to thank Eagle's International for a nice job they have done on this site. If you are not a member, you should think about it. Cheryl and I have been members since we before we bought our Eagle. You will not find a better group of people. Happy Traveling
Duane & Cheryl
St. Louis, MO
1989 Eagle Model 20 40 ft
6v92 ddec II ht 748r
The first thing we did was to remove the road a/c, this model had the a/c condenser and fan motors above the engine. We also removed the seats and luggage racks. I will never remove seats from another bus, we found some really odd things there as well as in the luggage carrier.
The next task we tackled was raising the roof 6'", Cheryl was very concerned about doing this. When I told her we are going to cut the roof off, she wanted to know where the exit was to escape.
Then came the job of removing the front cap. All the work that you will see done on the Eagle was perfromed by just Cheryl and me.
Finally it was time to install the new cap. This was not as easy as I thought it was going to be with just 2 people doing it. I had Cheryl stand in the drivers area as I lifted it up to her on a scaffold.
I told Cheryl that now it was time to finally have some fun. We began to install the 18 ga steel on the sides, it was July and 100 degree's out. The sheet steel was so hot that we needed gloves to handle it.
Next on this list was to convert the baggage door to cafe doors. I thought I could make a jig to do this, but found out that every door opening was alittle different.
Cheryl then said it was time that we found something really exciting, like a bedroom slide out
Well that little excitiment of the bedroom slide out took 6 months of my time.
In the end it was all well worth it , as you will see in the final pictures.
We decided that since we had a bedroom slide out, why not have a living room slide out as well.
Winter has set in and it gets really cold working outside all the time.
Long time coming, but all the new polished aluminum siding is on the Eagle.
Well it's time to move to the interior since winter has come. All of the interior walls were coated with black undercoat spray
I ran all 110v wiring in blue conduit thru out the bus.
The foaming of the interior walls was not one of our favorite things to do.
Now it was time to put the plywood on the walls.
Instead of using screws to hold the plywood we countersunk each hole and used steel pop rivets.
The 12 volt supplines lines were also run in blue conduit.
The rear veiw camera installed.
The layout of the left side water panel.
The finished left side water service panel.
The right side water control panel
This is the Hurricane hot water heat system. It also heats all of our hot water for dishes and showers. It is diesel fired and also runs on electric as well.
The right cargo area with slide out.
Time to move on to getting the generator in place. It is a 13kw Kubota 4 cyl, all of the parts I got from Dick @ Wrico. This gentleman is one of the best to work with.
I never thought I would make it to working on the interior, but that day finally came.
This is the future cabinet that will have the 37" LCD pop up tv.
Moving onto the front overhead cabinet.
This is the right side of the interior in the living room.
The overhead cabinets above the driver area.
The copilots chair.
The living room slide out on the left front side.
Looking from the front of the bus into the kitchen, this door goes into the bedroom.
This is the kitchen area on the right middle side of the bus.
The control panel area on the left middle of the bus in the kitchen. This area controls the 2 Trace Inverters 2500 mc, the 3 a/c units and the tank monitors.
The full size double door frig.
Looking from the bedroom into the kitchen.
This is the future area for the 110v control system bought from West Marine. The coach is all electric, we did not need 220v so the panels are split into 2 separate 110 v panels. this makes it easier to monitor all the usage.
Pocket door leading to the toilet.
The shower roughed in.
Working on the enclosed toilet area.
Finally finished the toilet area and the pergo floor.
Time to move back into the bedroom and vanity area.
This is the rear of the bus and the bedroom area.
This is the bedroom slide out on the right rear side of the bus.
Wow it's time for me to have some fun with this bus project. This is the rear bedroom 26" LCD tv with a dvd player in the lower part of the cabinet.
The rear bedroom pop up tv done.
Finally starting to see some progress now. This is the kitchen done except for some trim work and staining on drawers.
This is the living room ceiling finished in an off white headliner, with fabric covered dividers at the joints.
The right side of the bus in the living room, this is the cabinet that has the LCD pop up tv.
The LCD TV raised for viewing. This can be viewed from the living room couch, the dinette, or the front drivers seat when it is turned around.
The left side of the dash finished. The GPS is located on the upper dash above the heater controls.
The right side of the dash.
The laptop is mounted between the captains chair and the copilots chair. It runs the Silverleaf software to monitor all of the engines outputs.
This is the living room slide out finished except for some minor trim.
Looking up in the bedroom is the mahogony tongue and groove ceiling.
The right side of the bedroom finished.
This is the entry steps to the coach.
This is the entry to the Eagle.
The right front bay is for my tool box, aux air compressor and retractable 110v cord. This is all on a slide out tray.
The tool box out for access to the air compressor.
The house batteries are next to the entry door on the right side, it is on a slide out for checking status of the batteries.
The house batteries with the slide out for viewing.
Hoooraaayyyy finally on the road but not painted yet, just in white expoxy primer,, but WE LOVE IT!!!!
If you have viewed these pictures, we want to thank you for your interest and also want to thank Eagle's International for a nice job they have done on this site. If you are not a member, you should think about it. Cheryl and I have been members since we before we bought our Eagle. You will not find a better group of people.
Duane & Cheryl
St. Louis, MO
1989 Eagle Model 20 40 ft
6v92 ddec II ht 748r