
Announcement Block
As of 12/1/2021, a major update of the forum software was accomplished
Update: 4/20/2024: The Eagles email account at GoDaddy no longer works. I have set up a gmail account as a workaround: eaglesinternational.email@gmail.com (This link seems to work for my outlook email, but may not work for other email platforms. If it does not load, copy and paste the link in your platform.)
Registration is open to the public (*) and free from any cost or obligation. Please allow up to 36 hours for your application to be processed. If you have problems registering, please email me at: eaglesinternational.email@gmail.com
(*) spambots will be deleted -- only legitimate public applications will be processed.
Reminder: the "quick links" menu offers you the best navigation of this forum -- you need to be registered and logged in to see that menu.
Van & Cheryl's 89 model 15
-
Eagle Andy

- Club Member

- Posts: 1024
- Joined: Tue Oct 14, 2008 4:37 pm
- FMCA #: F299044
- Bus Model: 1968 SE Model 05
- Location: Miles city Mt
Re: Van & Cheryl's 89 model 15
Nice work Van man keep that up and you might have a new career in the future . Looks good . 
Andy Wright 68 Silver Eagle Model 5 8V92 #7481
-
Songman

- Club Member
- Posts: 2107
- Joined: Tue Oct 07, 2008 1:48 am
- FMCA #: F404262
- Bus Model: 1993 Silver Eagle Model 15-45
- Location: Nashville, TN
- Contact:
Re: Van & Cheryl's 89 model 15
Marie said to tell you that she is envious of your garage! She never gets to do anything with ours because I have so many 'projects' in there. You can see in this picture how the walls are just lined up with stuff. It only looks this clean because I had to get the Bug in there.

Dale Houston
1993 Eagle 15-45
Nashville, TN
1993 Eagle 15-45
Nashville, TN
-
Sunchaser Art
- Board Member
- Posts: 331
- Joined: Mon Oct 13, 2008 10:12 pm
- FMCA #: F351294
- Bus Model: 1988 Eagle 15
- Location: Riverside, CA
- Contact:
Re: Van & Cheryl's 89 model 15
Van & Cheryl-
Looking way good--and in good time too! So, next year at the Q, the party's going to be in your bus!! Isn't it amazing how fast it goes once you get going. . .by Quartzsite, I bet you're going to be fully built.
All the best--and more!
Art & Cindy
Looking way good--and in good time too! So, next year at the Q, the party's going to be in your bus!! Isn't it amazing how fast it goes once you get going. . .by Quartzsite, I bet you're going to be fully built.
All the best--and more!
Art & Cindy
Art Wales
1988 Eagle 15
6V92/740
Riverside County, CA
1988 Eagle 15
6V92/740
Riverside County, CA
-
van
- Club Member
- Posts: 1437
- Joined: Mon Oct 13, 2008 1:35 pm
Re: Van & Cheryl's 89 model 15
Thanks every one for the kind review  First person to get the atta boys should be my darling wife for backing me along the way. I suspect that once all this fire wood is installed that Cheryl will undoubtedly take over the decorating of the interior as I have always been fond of the military's CARC painted tank interiors LOL! but seriously as the Q steadily approaches my goal is to make the bus as comfortable as possible for us by at least having some running water, don't care if it is cold or not , and some way to make coffee with out having to fire up the honda early in the am. Once the pantry side of the kitchen cabinets are completed, the goal then is to get the bed pedestal completed so we are off the floor and high and dry Our garage is always changing to accommodate my needs, wrenching on Harleys (which funds the conversion) or now doubles as a wood shop during the high heat of the summer. Thanks again for all the support, you guys are the best!
  Art, yes coctails will be in our coach next year
-
Boomer

- Club Member
- Posts: 780
- Joined: Mon Nov 17, 2008 12:26 am
- FMCA #: F352905
- Bus Model: 1981 Eagle M10. Stretched, widened, raised to M15/45 specs. Cummins ISM 450, Allison World transmission. Mid entry door.
- Location: Southwest Washington
Re: Van & Cheryl's 89 model 15
Van, remember that last sentence buddy.
-
van
- Club Member
- Posts: 1437
- Joined: Mon Oct 13, 2008 1:35 pm
Re: Van & Cheryl's 89 model 15
LOL Thanks Boomer! It is not often that we will have the opportunity to serve cocktails on the coach, so what the heck! here's the line up, sleeping accommodations for 2, dinner for 2, cocktails for as many as we can stuff in Open to all, 18 and over while supplies last All are welcome
Van
Van
-
van
- Club Member
- Posts: 1437
- Joined: Mon Oct 13, 2008 1:35 pm
Re: Van & Cheryl's 89 model 15
Another productive day (I think ?  )
)

pretty soon now! DOORS!
pretty soon now! DOORS!
-
van
- Club Member
- Posts: 1437
- Joined: Mon Oct 13, 2008 1:35 pm
Re: Van & Cheryl's 89 model 15
Finished my dash restoration project today, while at it I upgraded the instrument bulbs and sockets. Just thought I'd throw this in the project thread, and post this from the IEB, so far so good, pictures to follow as soon as I get them off my cell phone. Later! V
-
Sunchaser Art
- Board Member
- Posts: 331
- Joined: Mon Oct 13, 2008 10:12 pm
- FMCA #: F351294
- Bus Model: 1988 Eagle 15
- Location: Riverside, CA
- Contact:
Re: Van & Cheryl's 89 model 15
Hey Van--where's the pics?? I'm hoping to snag some ideas for the dash!
Art Wales
1988 Eagle 15
6V92/740
Riverside County, CA
1988 Eagle 15
6V92/740
Riverside County, CA
-
van
- Club Member
- Posts: 1437
- Joined: Mon Oct 13, 2008 1:35 pm
Re: Van & Cheryl's 89 model 15
Lol! Thanks for reminding me Art  almost forgot. Here is the first one. this shows the front and rear air gauge with the mount for the original bulb and socket

Next one shows the original (bottom), and the newer bulb and socket (top)

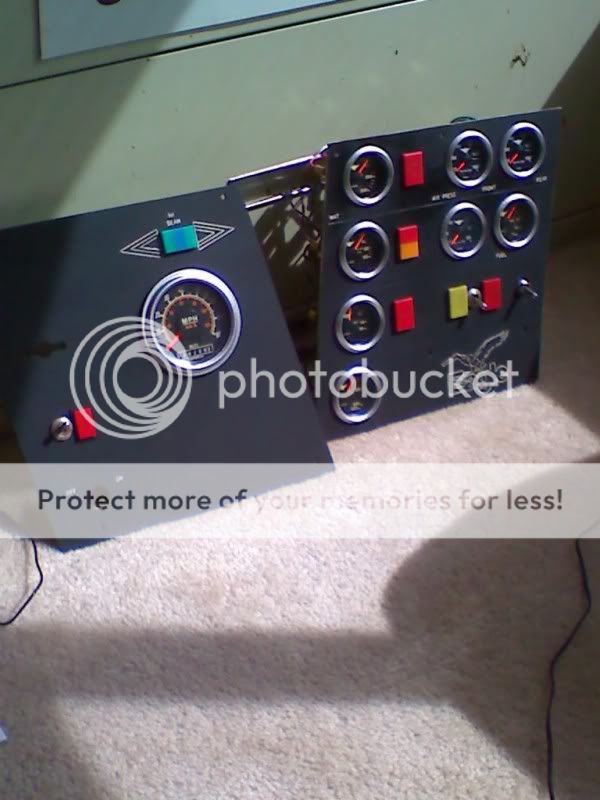
Cutting off the original mount at the bottom of the split, leaving around 3/16th of a lip, I epoxied 3/4" length of rubber ( to hold the new sockets in place) to the lip as shown in this next photo

The wiring is pretty straight forward, added male flat spade connectors to the new sockets and re-attach to the harness, I must mention that you can and should trim off any extra wire on the harness as to keep things tight and tidey (makes for sticking the panels back in the dash a little easier. Now I don't know about your particular gauges (age) but the glass itself on mine was dusty/dirty inside, and it shows real well with the gauge fully illuminated by the new brighter bulbs so I gingerly cut open each gauge a 1/4" back from the bezel as shown in the above photo ( one on the left) I used a hack saw to score a line around the gauge and finished the cut with sharp razor, cleaned the inside glass and re-assembled the two halfs using JB Weld. After painting the panels over in a non gloss black primer/paint spray paint to eliminate glare off of the plastic during the daytime as well as night time from the interior lighting. Also paint on the gauge bezels themselves were pretty faded, so after prepping the faces I painted those as well with metalic silver, and Viola! here are the results
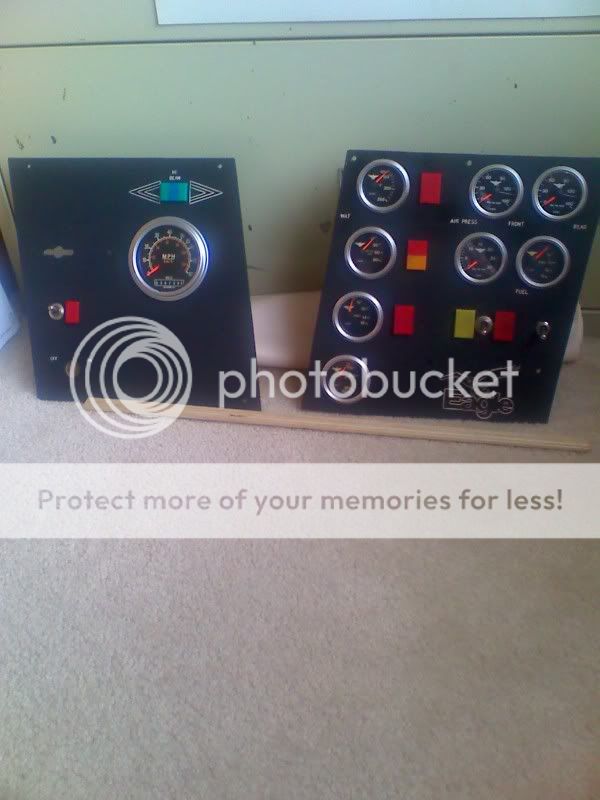
And while you are at it a good inspection and cleaning of the terminals and replacement of any corroded connectors should be in order. Now I still have to finish re-engraving the panels to reveil the original gauge markings to give it that fresh new look! To be continued....
Next one shows the original (bottom), and the newer bulb and socket (top)
Cutting off the original mount at the bottom of the split, leaving around 3/16th of a lip, I epoxied 3/4" length of rubber ( to hold the new sockets in place) to the lip as shown in this next photo
The wiring is pretty straight forward, added male flat spade connectors to the new sockets and re-attach to the harness, I must mention that you can and should trim off any extra wire on the harness as to keep things tight and tidey (makes for sticking the panels back in the dash a little easier. Now I don't know about your particular gauges (age) but the glass itself on mine was dusty/dirty inside, and it shows real well with the gauge fully illuminated by the new brighter bulbs so I gingerly cut open each gauge a 1/4" back from the bezel as shown in the above photo ( one on the left) I used a hack saw to score a line around the gauge and finished the cut with sharp razor, cleaned the inside glass and re-assembled the two halfs using JB Weld. After painting the panels over in a non gloss black primer/paint spray paint to eliminate glare off of the plastic during the daytime as well as night time from the interior lighting. Also paint on the gauge bezels themselves were pretty faded, so after prepping the faces I painted those as well with metalic silver, and Viola! here are the results
And while you are at it a good inspection and cleaning of the terminals and replacement of any corroded connectors should be in order. Now I still have to finish re-engraving the panels to reveil the original gauge markings to give it that fresh new look! To be continued....